Hugo: Personal Blog Deployment
Table of Contents
If my supervisor knew that I was not writing the paper these days, but building my blog, the consequences would be terrible. Anyway, Happy Lunar New Year! 🧧 🧨 🎉
Overview #
I use Hugo as a framework for website development, combined with GitHub Actions and GitHub Pages to automate website building and deployment. For the workflow shown in the figure, we just need to push the source code from the local to the GitHub repository, and GitHub Actions will automatically build and publish it to GitHub Pages for fast website deployment.
Hugo #
Hugo is a popular open-source static site generator written in Go. It is fast, flexible, and supports Markdown, which makes it one of the ideal frameworks for personal blogs. You can write blog posts in the familiar Markdown format and Hugo will automatically convert them to static web pages, which improves our writing experience.
Install Hugo #
The first step is to install Hugo. Its website provides installation tutorials for different development environments. If you are using Windows, I recommend downloading the installer from the release page on GitHub. Here I downloaded the extended edition of Hugo, unzipped it into the installation directory and added the path to the system environment variables. You can confirm whether Hugo is installed correctly by executing the following command:
Hugo verison
# If Hugo is installed correctly, it will output:
# hugo v0.122.0-b9a03bd59d5f71a529acb3e33f995e0ef332b3aa+extended windows/amd64 BuildDate=2024-01-26T15:54:24Z VendorInfo=gohugoio
Create a new project #
I prefer to keep the source code separate from the generated files of the static site so that I can deploy my blog without leaking the source code. According to this requirement, you can create a private GitHub repository to host the Hugo project. After cloning the repository above, you can initialize a Hugo project by executing the following command in the root directory:
Hugo new site . --force
The directory structure of the project is as follows. I only cover how to deploy a website quickly here, but if possible, I’ll devote serval blog posts to describe the details of Hugo’s configuration (You can also find the documentation from the Hugo official website).
.
├── archetypes
├── assets
├── content
├── data
├── i18n
├── layouts
├── static
├── themes
└── hugo.toml
Configure Hugo theme #
The most essential part of building a personal blog is, of course, choosing a favorite theme. You can browse the Hugo website and select a theme you like. As you can see in the footer of the web page, my site applies the Congo theme. By executing the following command, you can install Congo in the themes folder (For other themes, refer to their documentation).
# cd to the root directory first.
git submodule add -b stable https://github.com/jpanther/congo.git themes/congo
Most themes provide a sample site (in the exampleSite folder) that users can deploy quickly. You can replace the contents of the root directory with the contents of the exampleSite folder. Note that you need to set the baseURL parameter to your blog URL (https://<username>.github.io/), which I’ll introduce in the GitHub Pages section. You can also easily add an article using the Hugo command as follows.
# For example: hugo new content/test.md
hugo new [Markdown File Path]
Local debug and preview #
Before publishing, you need to debug and preview locally first with the following command. If you want to display the drafts, you can add the --buildDrafts option at the end. After running successfully, you can open your browser and preview the website at http://localhost:1313/
hugo server
# If you want to display the drafts, you can execute this command
hugo server --buildDrafts
GitHub Pages #
If you are satisfied with your local web pages, now you can deploy them to the Internet. In general, deploying a website requires a domain name and web hosting, both of which are purchased for a fee. Here I choose GitHub Pages as the solution.
GitHub Pages is a free static site hosting service that takes front-end files straight from a GitHub repository and publishes a website. It is integrated with GitHub, making it easy to deploy and track changes to your website. By default, the website will be accessible at a subdomain under github.io, which saves us from having to buy an additional domain name.
As I mentioned earlier, you need to create a public GitHub repository to store the built front-end files for website publishing. The name of the repository must meet the <username>.github.io format (<username> is your GitHub username in lowercase). Now you just need to push the built website files to this GitHub repository.
GitHub Actions #
Building and pushing manually would be too time-consuming. GitHub Actions is a continuous integration and continuous delivery (CI/CD) platform that allows you to automate your software development workflow directly within your GitHub repository. By writing workflow scripts, It can help us to build and deploy the website automatically and we just push the source code to GitHub.
Since we’re using two repositories for the source code and the built website files, we’ll need to generate an access token for the GitHub Actions to push the built files to the repository hosting the website.
Generate access token #
- Click the avatar of your GitHub and click the following buttons in turn (
Settings -> Developer Settings -> Personal access tokens -> tokens (classic) -> Generate new token) to enter the token generation page. - In the
Expirationoption, selectNo expiration. In theSelect scopesoption, selectrepoandadmin:repo_hook. - Click the
Generate tokenbutton.You have to save the generated token because it will only be displayed once!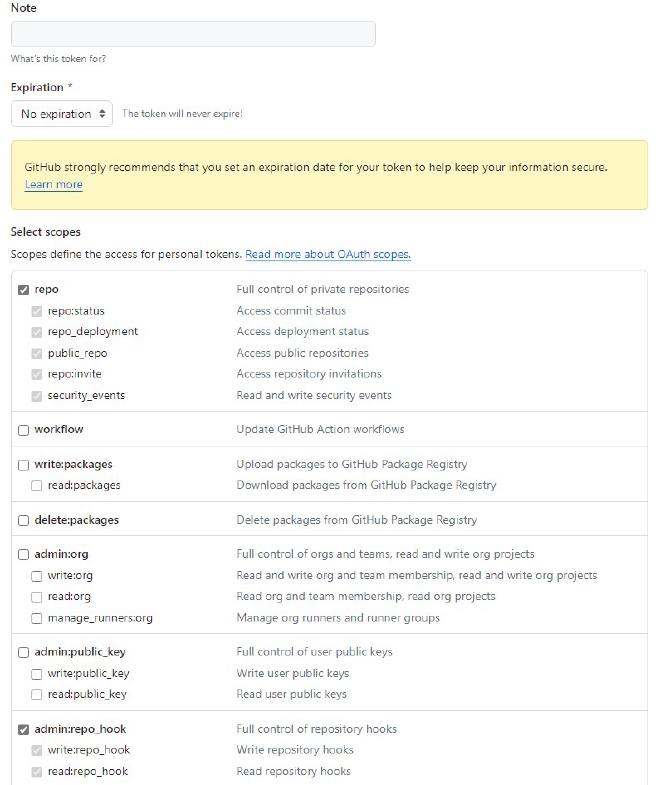
Generation of a personal access token

Add access token #
Then we need to add the token for the GitHub Actions of the source code repository.
- Open the GitHub page for the source code and click the following buttons in turn (
Settings -> Secrets and variables -> Actions -> Secrets -> New repository secret). - Paste the saved token into the
Secretbox and give a name for it.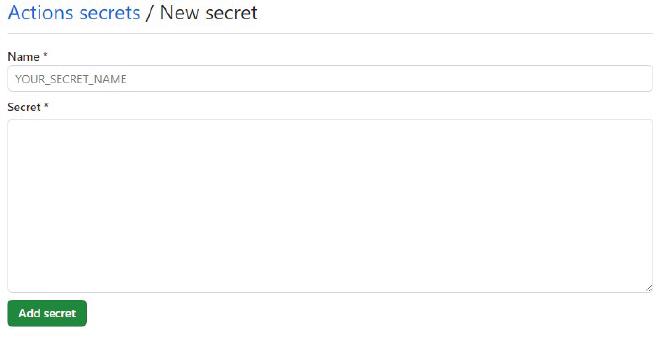
Add the secret for the GitHub Actions of the source code repo.

Configure GitHub Actions #
In the root directory of the source code repository, you need to recursively create the .github/workflows/ folder and create a YAML file in this folder. Here’s an example YAML file, where you need to replace <repoName> and <secretName> with the name of the repository hosting your website and the secret of GitHub Actions, respectively.
name: github pages

on:
  push:
    branches:
      - main

jobs:
  deploy:
    runs-on: ubuntu-latest
    steps:
      - uses: actions/checkout@v2
        with:
          submodules: true
          fetch-depth: 0

      - name: Setup Hugo
        uses: peaceiris/actions-hugo@v2
        with:
          hugo-version: 'latest'
          extended: true

      - name: Build
        run: hugo --minify

      - name: Deploy
        uses: peaceiris/actions-gh-pages@v3
        with:
          external_repository: <repoName>
          personal_token: ${{ secrets.<secretName> }}
          publish_dir: ./public
          publish_branch: main
Deploy website #
You just need to push your source code to the GitHub repository. Try visiting your blog site!